
OEM Sub-Label Configuration for I-con Software
Revision 002
Date: June 2026
1. Purpose
This document provides formal step-by-step instructions for authenticating and using the OEM Sub-Label Tab within the I-con software application. It is intended for authorized personnel who have been granted access to the Sub-Label feature by Infinitum technical support.
Instructions for Zebra printer setup required to physically print sub-labels are documented separately in:
• Zebra Printer Zt411 Setup Manual
2. Hardware and Software Requirements
The following items must be available and properly configured before proceeding:
| Item | Details |
| Windows Laptop | Running a supported version of Microsoft Windows |
| Zebra Printer ZT411 | Thermal transfer label printer |
| Zebra Windows Printer Driver | Version 10 (zddriver-v1062628275-certified.exe) |
| Zebra Setup Utilities | For Windows (zsu-1191327.exe) |
| I-con Software |
v2.100.912.0 or later. Installer: ICon_Installer_v2.100.912.0_Customer.msi Installed to: C:\Program Files (x86)\Infinitum-Icon |
3. Install I-con Software
• Run the installer: ICon_Installer_v2.100.912.0_Customer.msi
• Follow the on-screen installation instructions. Upon completion, MotorControl.Engineer.exe will be installed to C:\Program Files (x86)\Infinitum-Icon
4. Set Up an MST Account
• Follow the instructions online: I-con User Registration Process
5. Authentication on the I-con Sub-Label Tab
Once access to the I-con Sub-Label feature has been granted by Infinitum technical support, proceed as follows:
• Ensure the laptop is connected to the internet.
• Open I-con software and navigate to the Authentication tab.
• Enter the MST account username and password, then sign in.
Note: The I-con Sub-Label Tab is only accessible after successful authentication.
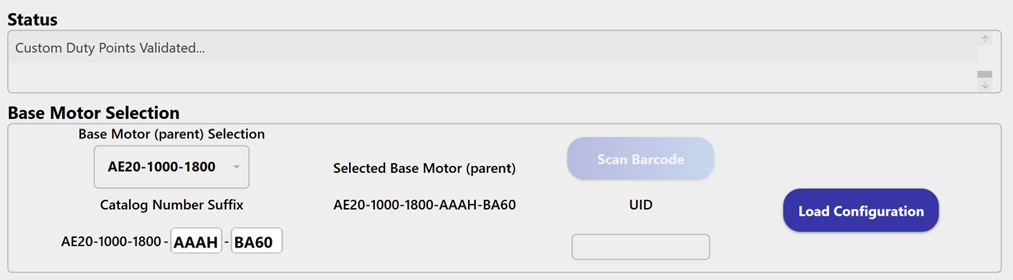
6. I-con Sub-Label Tab: Base Motor Selection
6.1 Select the Base Motor
From the I-con Sub-Label Tab, locate the Base Motor drop-down list and select the base motor model that is to be configured.
6.2 Enter the 8 Suffix Characters
Using the motor nameplate as reference, enter the 8 suffix characters into the designated field.
6.3 Load Configuration
Load the Base Motor Selection, the Suffix, the custom horsepower, and custom speed from a Json File that can be created with “Save Configuration” in the Custom Duty Point section.
7. I-con Sub-Label Tab: Custom Duty Point Section
7.1 Enter the Desired Duty Points
Enter the desired horsepower and speed duty points into the respective fields provided on the Custom Duty Point section.
7.2 Validate the Custom Duty Points
Click the Validate button to verify that the entered duty points are compatible with the selected base motor.
• If the Validation Status displays "Valid", proceed to Section 8.
• If the Validation Status displays "Invalid", either there is a poor internet connection or the requested horsepower and speed duty points are not compatible with the selected base motor. Contact support@goinfinitum.com for further assistance.
7.3 Save Configuration
Saves the Base Motor Selection, the Suffix, the custom horsepower, and custom speed into a Json File that can be loaded with “Load Configuration” in the Base Motor Selection section.
8. I-con Sub-Label Tab: Sub Label Printing Section
This section is only accessible once the Custom Duty Point has been successfully validated in Section 7.
8.1 ADD SN Button
Serial numbers may be added to the list manually using the ADD SN button.
• Type a serial number into the serial number entry field.
• Click ADD SN to add it to the list.
Note: All serial numbers must conform to the following format:
(0–9) (0–9) (0–9) (0–9) (A–Z) (A–Z) (A–Z) (0–9) (0–9) (0–9) (0–9) (0–9) (0–9)
8.2 REMOVE SN(s) Button
To remove serial numbers from the list:
• Select one or more serial numbers from the list.
• Click REMOVE SN(s) to remove the selected entries.
Note: To select all serial numbers at once, click the Select All Serial Numbers and Labels option.
8.3 Load SN Button
The Load SN button allows a large quantity of serial numbers to be imported at once from a CSV (.csv) file.
• Click Load SN.
• Browse to and select the CSV file containing the serial numbers.
• Click Open. The serial numbers will be imported into the list.
Note: All serial numbers within the CSV file must conform to the format specified in Section 8.1.
8.4 Generate Labels Button
Once serial numbers have been entered, sub-labels can be generated.
• Click Generate Labels.
• The software will generate sub-label bitmap files for all serial numbers in the list and save them to C:\labelBitmaps.
• To view a label, double-click on the corresponding serial number or the label .bmp file.
Note: All generated labels will be deleted if a custom duty point value is modified after generation.
8.5 Printing Sub-Labels
Instructions for printing the generated sub-labels on a Zebra ZT411 printer are documented in the companion manual:
• Zebra Printer Zt411 Setup Manual
9. I-con Sub-Label Tab: Motor Configuration Section
9.1 Connect to the Motor
Establish a connection between the I-con software and the target motor using the appropriate communication protocol:
• TCP/IP connection, or
• Serial connection
Ensure that the correct communication protocol settings are applied before proceeding.
9.2 Verify Catalog Number Information
Once connected, the I-con Sub-Label Tab will display the following information:
• Active Catalog Number – the current catalog number programmed on the motor.
• New Catalog Number – the new catalog number that will result from the custom duty point configuration.
Review both values carefully before proceeding.
9.3 Configure the Motor
• Click Configure Motor.
• A confirmation dialog will appear. Click Yes to confirm.
Two outcomes are possible:
• If the motor is an Infinitum Base Motor:
◦ The motor will be reconfigured with the new custom horsepower and speed duty points.
◦ The Active Catalog Number will update to reflect the new configuration.
◦ Tip: Verify the result by checking the catalog number on the Motor Information tab.
• If the motor is not a base motor:
◦ The following error message will be displayed. Contact support@goinfinitum.com for further assistance.
Note: I-con will also not allow motor configuration for serial numbers that are not present on the List of Serial Numbers and Labels.